
Introduction
A well-kept chef knife is a must for the kitchen since it allows you to slice, dice, and chop with accuracy. Maintaining your knife’s edge is important, but so is making sure it’s still safe and useful. A sharp chef knife is one of the most important kitchen tools you may have. Working with a dull knife might not only be unpleasant, but it can also be dangerous. We will discuss “How to Sharpen A Chef Knife” using rod/honing, whetstone and electric sharpener.
This post will examine the fine skill of excellent chef knife sharpening. Whether you’re a home cook or a professional chef, acquiring this skill is crucial for accuracy in the kitchen. We’ll go over everything you need to know about the art of sharpening a chef’s knife, from the instruments to use to the methods that will turn you into a sharpening pro.
Understanding Your Knife
Understanding your knife is essential before you start sharpening. Knives come in a variety of materials and angles, which affects how they are sharpened. Determine the type of knife you have first because this will determine how you proceed.
Sharpening Methods
How to sharpen a chef knife using rod
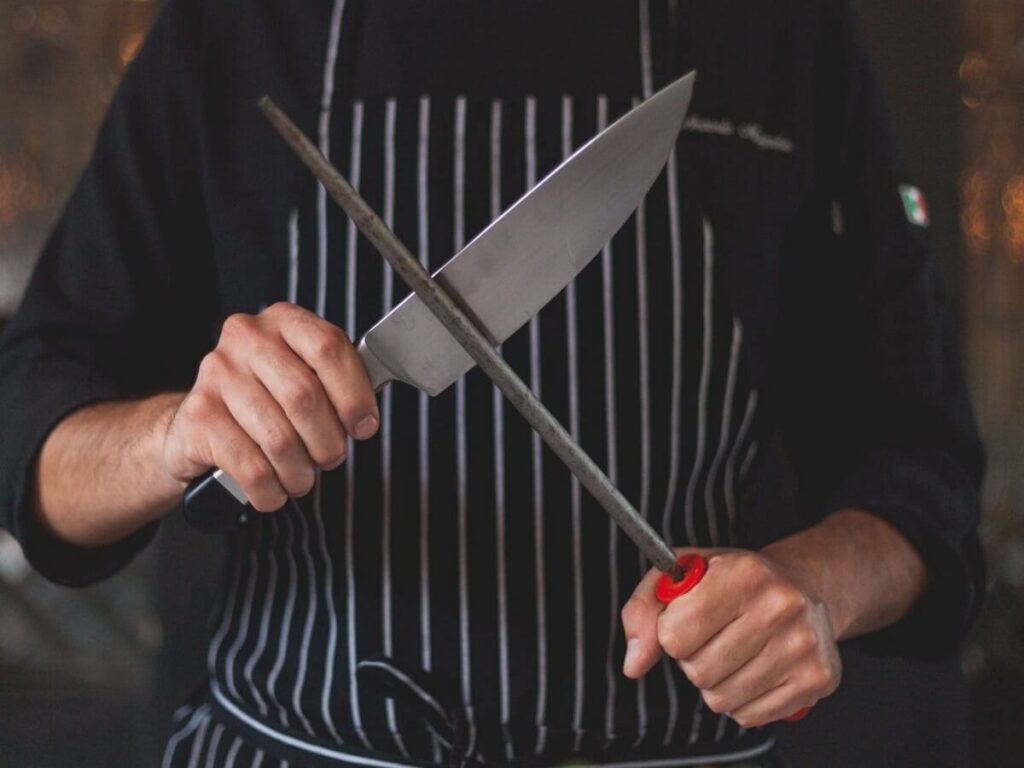
Maintaining the sharpness of your chef knife requires regular honing. In this procedure, the knife’s edge gets adjusted using a honing rod, sometimes referred to as a sharpening steel. Contrary to popular belief, honing actually straightens and aligns the blade’s microscopic teeth rather than removing metal from it.
Here’s how to properly hone your knife:
- Hold the Rod: Start by holding the rod upright with the tip resting on a solid surface, like a countertop.
- Position the Knife: Hold your chef knife against the honing rod at a 15-20 degree angle. The manufacturer’s recommendations and the design of the knife determine the angle.
- Begin Honing: Start honing by sliding the knife’s edge along the honing rod with light pressure, working your way up to the tip from the base near the handle. Keep the same angle throughout the entire process.
- Alternate Sides: To guarantee even honing, after honing one side of the blade, move to the other side and continue the operation an equal number of times.
- Test for Sharpness: After honing, slice through a tomato or a piece of paper to determine the knife’s level of sharpness. It may need to be sharpened if it still seems dull.
On the other hand, sharpening is a more involved procedure that requires taking a small amount of metal out of the blade to produce a fresh, cutting edge. When your knife has grown obviously dull and honing no longer works to get it sharp again, it is crucial.
Here’s a basic guide to sharpening your chef knife with a whetstone:
- Whetstone Soak: If using a water whetstone, make sure it is completely wet by soaking it in water for 10 to 15 minutes.
- Select the Angle: Choose the proper sharpening angle for your knife, which is usually between 15-20 degrees.
- Begin Sharpening: Start sharpening by holding the knife at the desired angle while placing the whetstone on a firm surface. Draw the knife across the whetstone in a sweeping motion from the base of the blade to the tip while applying light pressure. Consistently hold the angle.
- Alternate Sides: After making a few passes on one side of the blade, move to the other side and proceed as before. Repeat this back-and-forth motion until the required sharpness is attained.
- Test for Sharpness: Check the knife’s sharpness, just like you would with honing. Wash the knife well to get rid of any metal shavings if it is suitably sharp.
In conclusion, honing is a maintenance method used to maintain the alignment of your knife’s edge and increase the interval between sharpening sessions. On the other hand, sharpening is a more sophisticated procedure used to remove metal from a dull blade in order to make it sharp again. Both methods are necessary to preserve the functionality and longevity of a chef knife.
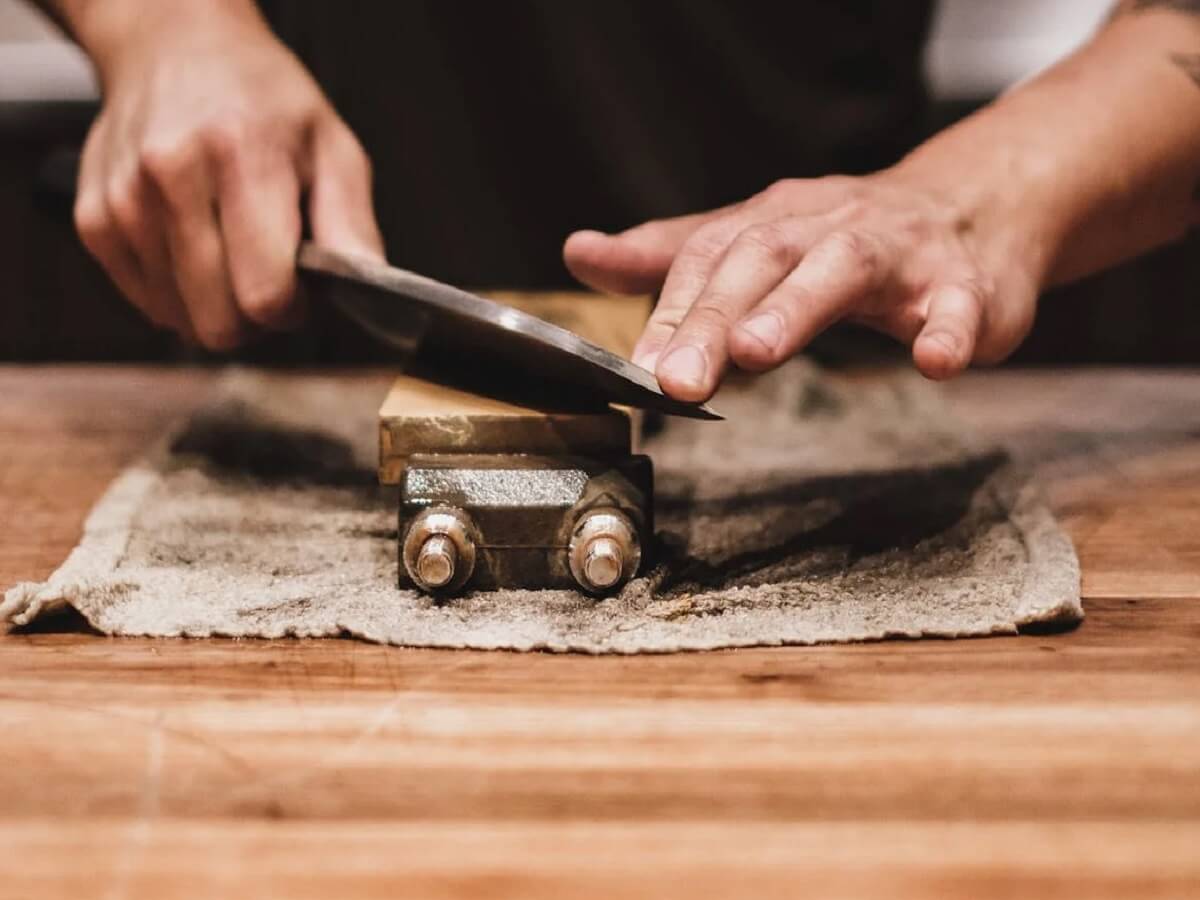
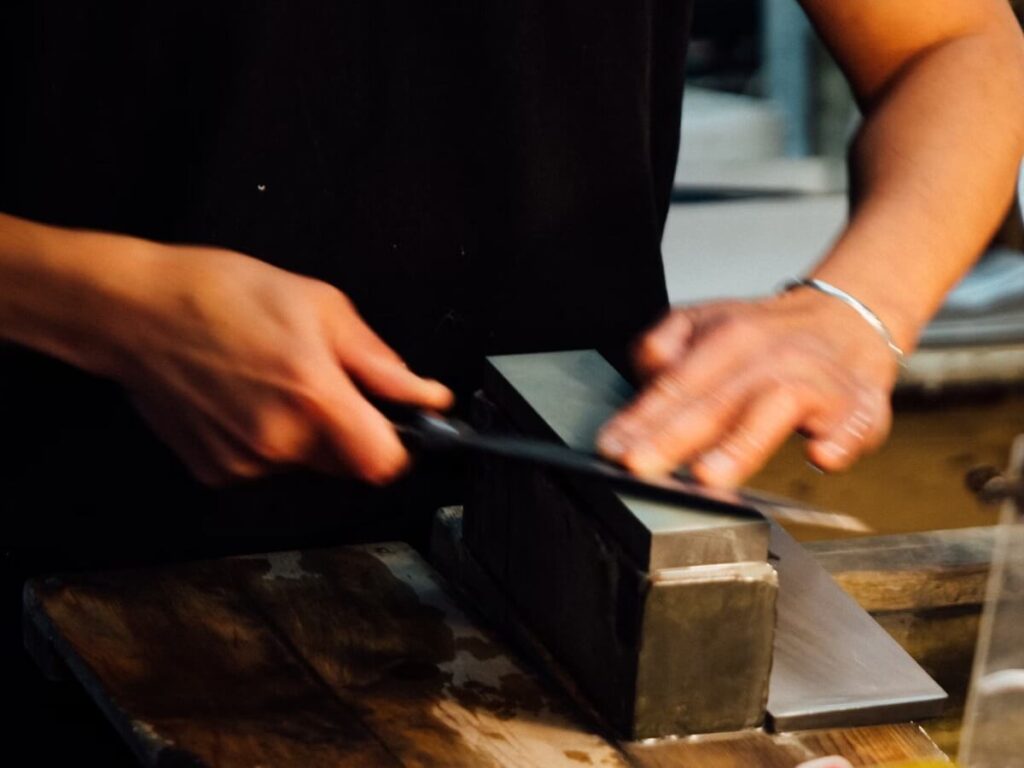
How to sharpen Chef knife with Wheatstone
Prepare the Whetstone:
If using a water whetstone, submerge it in a container of water for 10 to 15 minutes, or until it is completely soaked. If you have an oil whetstone, you should use honing oil to lubricate it instead.
Determine the Angle:
Depending on the manufacturer’s recommendations and the style of your knife, the right sharpening angle normally ranges from 15 to 20 degrees.
Position the Whetstone:
Whetstone should be placed on a firm, non-slip surface, such as a moist cloth on your counter. Make sure that it won’t move while being sharpened.
Begin Sharpening:
Hold the knife with your dominant hand and place the blade’s heel (the widest part of the cutting edge near the handle) at the chosen angle on the coarse side of the whetstone.
Apply Pressure:
Slide the knife down the stone slowly from the base to the tip while applying light to moderate pressure. Use your other hand to guide the blade and ensure equal sharpening while maintaining a constant angle.
Repeat on Both Sides:
After a few strokes on one side of the blade, transfer to the other side and carry out the sharpening procedure once more. When the required amount of sharpness is reached, keep switching sides.
Check Progress:
By carefully running your fingertip along the edge, you can verify the blade’s sharpness from time to time. Be careful not to cut yourself. The blade should grow noticeably sharper as you do so.
Polish with the Fine Grit Side:
When you’re satisfied with the sharpness, switch the whetstone to the fine-grit side. To polish the edge and get rid of any last-minute burrs, repeat the sharpening procedure using the same method.
Clean the Knife:
After sharpening, thoroughly clean the knife to remove any metal shavings or residue from the whetstone.
Test the Sharpness:
Slice through some paper or a tomato to check the knife’s sharpness. It should glide effortlessly.
Maintain Your Whetstone:
Rinse and dry your whetstone after use and store it properly to keep it in good condition. Whetstone sharpening is a talent that takes time and practice to acquire, but once you do, you’ll have a chef knife that is razor-sharp and prepared to handle any culinary chore with accuracy.
Electric Knife Sharpeners
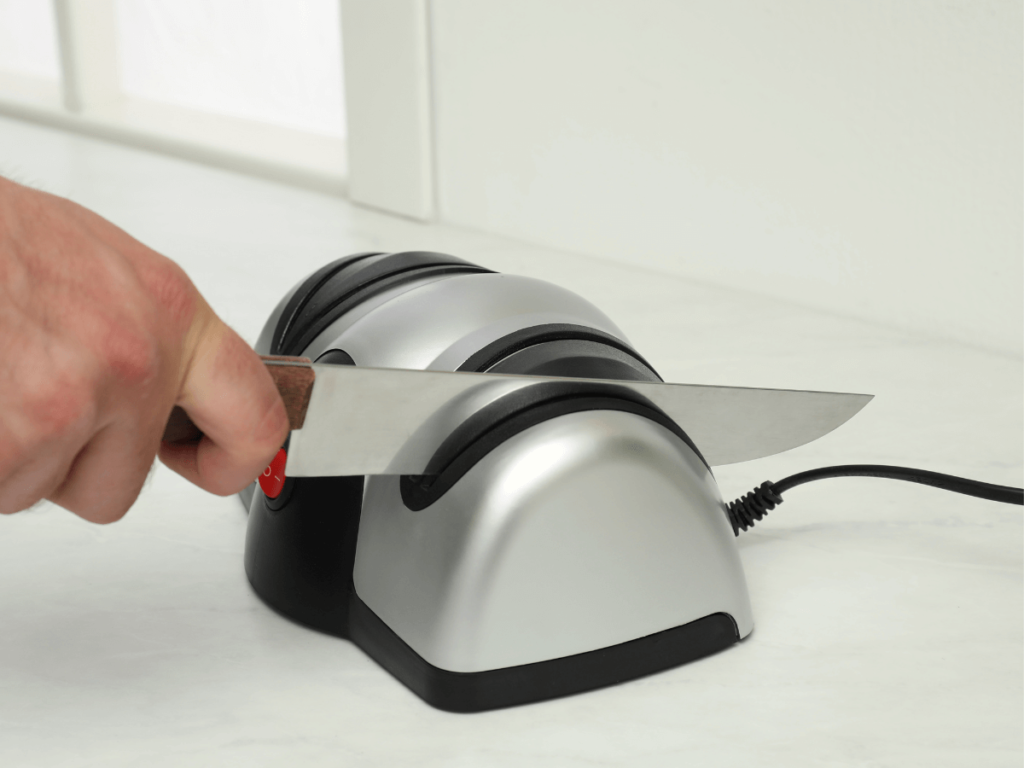
Electric Knife Sharpening is a quick and effective way to keep your chef knife or any other kitchen blade sharp. Home cooks who would not have the time or ability for manual sharpening methods are particularly fond of these tools.
Read the manufacturer’s instructions that are included with your electric knife sharpener carefully first. Different models could have different rules and characteristics. Most electric knife sharpeners have a number of slots, each of which has a specific function. Polishing, coarse sharpening, and fine sharpening are typical slots. Select the place that best fits the state of your knife at the moment. Plug the electric knife sharpener into a power source and ensure it’s stable on the countertop.
Look for any big nicks or damage on your chef’s knife. Before using the electric sharpener, you might need to professionally sharpen the blade if it is overly damaged. Otherwise, continue sharpening. Holding the chef knife with the blade facing down, place the sharpener’s designated slot over the blade’s heel. The design of the sharpener will determine whether you need to pull the knife through the slot or just place it and let it do its thing. For this stage, follow the manufacturer’s directions.
Keep applying consistent, even pressure to the blade as you move the knife through the slot. Usually, the electric sharpener will have built-in guides to guarantee the proper sharpening angle. You might need to repeat the sharpening procedure multiple times, progressively advancing to finer slots for a polished edge, depending on how dull your knife is.
Test the knife’s sharpness after sharpening it by carefully slicing through some paper or a tomato. It ought to cut with ease. To get rid of any metal particles or sharpening residue, wipe the knife. Electric knife sharpeners should be unplugged and stored securely in accordance with the manufacturer’s instructions.
Essential Sharpening Tools And Checklist
Whetstone or Sharpening Stone
Honing Rod or Sharpening Steel
Electric Knife Sharpener
Angle Guide
Honing Oil or Water
Cleaning Supplies
Knife Maintenance Tools
Protective Gear
Storage Solutions
Instructional Material
You can make sure that your chef knife and other blades stay sharp, secure, and useful in the kitchen by having some crucial sharpening equipment on hand and by practicing a little. Regular upkeep will increase your enjoyment of cooking while also extending your life.
Whetstone Chef Knife Sharpening Techniques
There are two primary techniques for sharpening your chef knife:
- The Push and Pull Method
- The Circular Motion Method
Let’s discuss both methods step by step
The Push and Pull Method
One of the primary methods for successfully sharpening a chef’s knife is the push-pull method. It includes an easy yet exact motion that can assist you in getting your blade’s edge to be razor-sharp. Here is how to apply this technique:
Prepare Your Whetstone: Ensure your whetstone is soaked in water for 15 to 20 minutes.
Find the Right Angle: It’s important to keep the right angle while sharpening. For the majority of chef knives, a 15-20 degree angle is ideal.
Start with the Push Stroke: Push the knife away from you along the length of the stone using light pressure. In this stroke, be sure to completely enclose the blade’s edge.
Reverse with the Pull Stroke: Reverse the motion after the push stroke is finished. Keep the same angle as you draw the knife back towards you. This movement aids in uniformly honing the entire blade.
Repeat the Process: Continue alternately using the push and pull strokes. Don’t forget to maintain the desired angle and press gently and firmly. To get the proper sharpness, it could take multiple strokes.
Test Your Knife: Make a quick test to see if your knife is properly sharpened. Try slicing a ripe tomato or a sheet of paper. The material should easily glide through with a sharp knife without being torn or crushed.
Honing: A honing rod should be used to realign the edge and remove any burrs that remain after sharpening. This action keeps your knife’s edge sharp over time.
When used correctly, the Push-Pull Method can sharpen your chef knife again and improve the efficiency and fun of your kitchen tasks. You’ll soon be able to sharpen your chef knife like a pro if you practice this method carefully and patiently.
The Circular Motion Method for Sharpening Chef Knives

The Circular Motion Method is another effective technique for sharpening a chef’s knife. This method involves a circular motion that evenly sharpens the blade. Here is a detailed explanation of how to apply this technique:
Prepare Your Whetstone: To begin, make sure your whetstone has been properly immersed in water for 10 to 15 minutes. To provide the required lubrication for sharpening, this step is crucial.
Find the Right Angle: It’s important to keep the proper sharpening angle. For the majority of chef knives, a 15-20 degree angle is ideal. To establish a constant angle for sharpening, you can either use an angle guide or practice.
Begin the Circular Motion: On the whetstone, position your knife at the desired angle. The Circular Motion Method entails making a circular pattern as opposed to the conventional back-and-forth motion. The pivot point of the knife should be close to the blade’s base when you begin to move it in a circular motion.
Cover the Entire Blade: Make sure to cover the whole edge of the blade as you continue to move in a circular manner. The full length of the knife may be sharpened evenly with this motion.
Maintain the Angle: Throughout the circular sharpening process, it’s essential to maintain the selected angle consistently. This ensures that the blade is sharpened uniformly.
Reverse the Circular Motion: Reverse the direction after a number of circular motions. To maintain balanced sharpening, continue honing in a circular motion but in the opposite direction.
Test your knife: Try a quick test to see if your knife has been sharpened enough. Try slicing a ripe tomato or a sheet of paper. A well-honed knife should not shred or crunch while cutting.
Honing: After sharpening, realign the edge of the blade and remove any burrs using a honing rod. The knife’s sharpness can be preserved and kept in top shape by honing.
With a little practice, you can get a razor-sharp edge with the Circular Motion Method, which provides an alternative method for sharpening your chef’s knife. To master this method of sharpening, consistency and, perseverance are essential.
FAQs
Is it possible to over-sharpen a knife?
Yes, it’s possible to over-sharpen a knife, especially if you use an aggressive technique or sharpen it too frequently. This can result in a fragile edge that chips easily.
Can I sharpen serrated chef knives?
Serrated knives require specialized sharpeners. It is best to refer to the manufacturer’s instructions or seek out expert assistance.
How can I maintain my knife between sharpening sessions?
Regular honing with a honing rod and proper knife storage can extend the time between sharpening sessions.
Can I use a sharpening steel instead of a whetstone?
While sharpening steel can help maintain the edge, it won’t sharpen a dull knife. For proper sharpening, a whetstone or electric sharpener is recommended.
What are the 3 Most Commonly Used Knives in a Chef’s Kitchen?
Despite the fact that there are many different knives, the chef’s knife, paring knife, and bread knife stand out as the three that are most frequently used.
Conclusion
In conclusion, the ability to sharpen a chef’s knife is a key talent that every cook should know. With a sharp knife, you may manage your cooking responsibilities more easily and be safe in the kitchen. You can keep your knife sharp and profit from its advantages in the kitchen by using the proper tools and methods.
Your cooking talents will be further improved as you acquire confidence and experience while honing your knife-sharpening techniques. So embrace the craft of sharpening knives, and may your kitchen be stocked with perfectly sharpened chef knives ready to take on any upcoming culinary challenges. Have fun cooking!